Showing posts with label Stuffed Animals. Show all posts

Monday, June 9, 2025

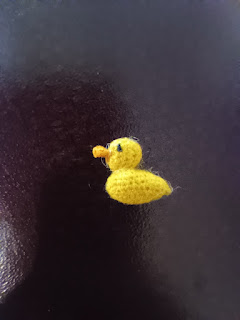
Microamigurumi Duck Pattern Idea


I made the pattern for this duck up. I never got it exactly how I wanted it, but here is a general idea of what I did for the next time I try to make a duck.

Body:
1. 8 SC in magic circle
2. (Sc, inc)*4 - 12
3. (2 sc, inc)*4 - 16
4-7. Sc around - 16
8. In the 1st stitch of each round from now on sl st + ch 1, then continue with pattern. 3 sc, Dec, 6 sc, 2 inc, 3 sc - 17
9. Sc, Dec, sc, Dec, 11 SC - 15
10. 3 Dec, 4 sc, Dec, 3 sc - 11
Stuff
11. 4 Dec, 3 sc - 7
12. Do not join. Ch 1, pinch top and bottom rows together and crochet through both top and bottom. 3 sc across
13. Ch 1, turn, 3 sc. Finish off

Head:
1. 8 SC in magic circle
2. (Sc, inc)*4 - 12
3. (2 sc, inc)*4 - 16
4-5. Sc around
6. (Sc, Dec)*4 - 12
7. Dec around until closed. Finish off

Bill:
In magic circle, sc 4
(2 hdc in 1st st, hdc in next)*2 -6

Tuesday, November 19, 2024

Microamigurumi Horse Crochet Pattern


This pattern is from crochetville.com. I altered the ears and opted to not make a saddle or harness.

Supplies:
Size 12 crochet hook
Light brown and black embroidery floss
Needle 

Head:
The end of each round is joined with a slip stitch to the first stitch made
Rnd 1: 6 sc in a magic circle
Rnd 2-3: Sc around - 6
Rnd 4: ch 1, sc in first 2 sc, inc in next 3 sc, sc in last sc - 9
Rnd 5: ch 1, sc in first 2 sc, inc in next 6 sc, sc in last sc - 15
Rnd 6-9: ch 1, sc around - 15
Stuff head
Rnd 11: ch 1, dec around - 5
FO leaving long tail. Use tail to close hole.

Ears: (make 2)
Ch 4, sc in 3rd st from hook, dc in last stitch, finish off

Neck:
Leave a long starting tail. This is the end that is sewn to horses head.
The end of each round is joined with a slip stitch to the first stitch made
Chain 11, join with slip stitch to first chain
Rnd 1: ch 1, sc in each chain around - 11
Rnd 2-3: ch 1, sc around - 11
Rnd 4: ch 1, (inc, sc)*5, sc in last sc - 16
FO leaving long tail. This is the end that is sewn onto the horse's body.

Body:
The end of each round is joined with a slip stitch to the first stitch made
Rnd 1: 6 sc in magic circle
Rnd 2: ch 1, inc around - 12
Rnd 3: ch 1, (inc, sc)*6 - 18
Rnd 4-5: ch 1, sc around - 18
Rnd 6: ch 1, (dec, sc)*6 - 12
Rnd 7: ch 1, sc around - 12
Rnd 8: ch 1, (inc, sc)*6 - 18
Rnd 9-10: ch 1, sc around - 18
Rnd 11: ch 1, (dec, sc)*6 - 12
Stuff body
Rnd 12: ch 1, dec around - 6
FO leaving long tail. Use tail to sew hold closed.
Stuff neck and sew to horse's body.

Legs: (make 4)
The end of each round is joined with a slip stitch to the first stitch made
Using contrast hoof color,
Rnd 1: 6 sc in magic circle
Rnd 2: IN BACK LOOPS ONLY. ch 1, sc around - 6
FO and switch to main color
Rnd 3-6: sc around - 6
Finish off leaving long tail.
Sew legs to body

Mane:
You will need several pieces of thread, cut into approx. 1 inch pieces. Each piece of yarn will act as 2 strands of hair.
Insert hook into horses head. Grab middle of yard strand with hook and pull through stitch, ( Like you would latch hook) making a small loop. Pull both free ends of yarn strand through loop, pulling tight to secure hair.
You will continue to do this down back of horses neck.
Trim hair evenly, or as desired.
Sew eyes on.

Sunday, March 3, 2024

Miniamigurumi or Microamigurumi Sparrow Bird Keychain Crochet Pattern


Made with embroidery floss - the size of a nickel


Made with crochet thread

Size comparison - crochet thread vs embroidery floss

Supplies needed:                            Crochet Key:
Dark brown thread                          DB = Dark Brown 
Black thread                                    B = Black
Grey thread                                     BLO = back loop only
Keychain ring                                  FLO = front loop only

Every round needs to be joined for this pattern. So at the beginning of every round, sl st in the 1st st, pull tight, ch 1, pull tight, then make the 1st stitch of the round in the same stitch as the sl st, ch1 was made in. This will keep the bird from being twisted.

If you want to make the larger sparrow, use size 10 crochet thread
If you want to make the smaller sparrow, use 1 strand of embroidery floss

Head: In grey
1: 4 sc in magic circle
2: 4 Inc - 8
3: [DB sc, Inc] [ Grey (sc, inc)*2] [DB sc, inc] - 12
4: [DB 2 sc, inc] [B (2 sc, inc)*2] [DB 2 sc, inc] - 16
5: [DB 3 sc] [G 4 sc] [B 2 sc] [G 4 sc] [DB 3 sc]
6: [DB 2 sc] [G 5 sc] [B 2 sc] [G 5 sc] [DB 2 sc]
7: [DB 2 sc, dec] [G 2 sc] [B 2 dec] [G 2 sc] [DB dec, 2 sc]
(Working the body now)
8: BLO [DB dec] [G sc, inc, sc] [B 2 inc] [G sc, inc, sc] [DB dec]
9: both loops [DB 3 sc] [G (2 sc, inc)*2, 2 sc] [ DB 3 sc]
Stuff head
10: sc around [DB 3 sc] [G 10 sc] [DB 3 sc]
11: [DB 3 sc] [G - sc, inc, 2 sc, 2 inc, 2 sc, inc, sc] [DB 3 sc]
12-14: sc around [DB 3 sc] [G 14 sc] [DB 3 sc]
15: [DB 3 sc] [G - sc, dec, 2 sc, 2 dec, 2 sc, dec, sc] [DB 3 sc]
16: [DB 3 sc] [G (2 sc, dec)*2, 2 sc] [DB 3 sc]
Stuff body
17: [DB 3 sc] [G (dec, sc)*2, dec] [DB 3 sc]
(Working the tail now)
18: [DB 3 sc] [G dec, sc, dec] [DB sc, ch 1, fold the round in half, turn, sc 4 across (going through the top and bottom) (the first and last sc will be through 2 DB, while the 2 middle sc will be through 1 G and 1 DB stitch)]
19: FLO - ch 1, turn, 4 sc across
20-21: In both loops, ch 1, turn, 4 sc
22: ch 1, turn, 2 dec
23-24: ch 1, turn, 2 sc
Finish off

Wing: Make 2 in dark brown
1: ch 14
2: beginning in the back loop of the 2nd ch from hook, 13 sc
3: ch 1, turn, dec, 7 sc, 2 dec - 10
4: ch 1, turn, 2 dec, 6 sc - 8
5: ch 1, turn, dec, 2 sc, 2 dec - 5
Finish off

Beak: In black
1: Ch 3
2: In 3rd ch from hook, 3 sl st
Finish off

Feet: Tie a little piece of black thread for the feet

Embroider the eyes and sew on the keychain ring.

Monday, January 8, 2024

Elephant Microamigurumi Crochet Pattern

Elephant #1

Elephant #1

Elephant #1


Elephant #2

Elephant #2


Materials:
Size 12 crochet hook
1 skein of grey thread
white thread for tusks (optional)
Black thread for eyes
Keychain ring

Legs: in grey - make 4
1. sc 4 in magic circle - 4
2. Inc around - 8
3. In BLO, sc around - 8
4-8. In both loops, sc around - 8
Finish off the first 3 legs, but don't finish off the 4th - continue with the pattern.

Upper Body:
1. Ch 1, 8 sc around leg 1, Ch 3, 8 sc around leg 2, Ch 1, 8 sc around leg 3, Ch 3, 8 sc around leg 4 - 40
2-5. sc around - 40
It is easier to stuff legs now. So, do it now.
6. (8sc, dec)*4 - 36
7. (4sc, dec)*6 - 30
8. (3sc, dec)*6 - 24
9. (2sc, dec)*6 - 18
10. (sc, dec)*6 - 12
11. (dec)*6 - 6
Finish off

Lower Body:
1. 1 sc, 3 sc in leg 1, 3 sc, 3 sc in leg 2, 1 sc, 3 sc in leg 3, 3 sc, 3 sc in leg 4 - 20
2. (sc, dec)*6, dec - 20
3-5. Dec until the bottom part of the elephant is closed.
Finish off

Head: In grey
1. sc 6 in magic circle - 6
2-8. sc around - 6
9. 4 sc, 2 inc - 8
10. 4 sc, 4 inc- 12
11. sc around - 12
12. 4 sc, 8 inc - 20
13-17. sc around - 20
18. 4 sc, (sc, dec)*8 - 12
19. 4 sc, (dec)*8 - 8
Stuff head
20. Dec around until closed
Finish off

Ears: Make 2 in grey
1. Sc 4 in magic circle - 4
2. Ch 1, turn, (sc, inc)*2 - 6
3. Ch 2, turn, dc, (2 dc & tc) in next st, (dc & hdc) in next st, sc, sc, dc - 9
4. Ch 2, turn, (2 sc) in 1st st, sc, sc, (2 hdc), hdc, (dc, tc, dc), sc, sc, sc - 13
Finish off

Tail: in grey
1. sc 3
2. Beginning in 2nd st from hook, sc across - 2
3-5. Ch 1, turn, 2 sc - 2
Finish off
Add tassel

Tusks: (Optional) Make 2 in grey
1. 3 sc in magic circle
2-4. sc around - 3
Finish off

Lip: (Optional, but I recommend it if you don't add tusks) In grey
Flip the elephant's head upside down. Starting on what is now the right side of the trunk, working in a semi-circle pattern so the lip encircles the bottom of the trunk, make 3 sc.

Assemble the elephant, embroider a face, and add a keychain ring. 

Monday, July 17, 2023

Wednesday, May 3, 2023

Updated Highland Cow Microamigurumi Crochet Pattern

 This pattern is about 1/3 smaller than my first cow. I like it better because the head is all in one, rather than having separate lips to sew on, and the legs are crocheted onto the body in one piece, rather than sewing them on separately.


Head: In brown
1. 4 sc in magic circle
2. (Inc, SC)*2 - 6
3. (SC, inc)*3 - 9
4. 3 SC, 3 inc, 3 SC - 12
5. 3 SC, (1sc, inc)*3, 3 SC - 15
6. (4 SC, inc)*3 - 18
7. (5 SC, inc)*3 - 21
8. (6 SC, inc)*3 - 24
9-11. SC around - 24
12. (6 SC, Dec)*2, 5 SC, 2 dec- 20
13. (3 SC, Dec)*5 - 12
14. (2 SC, Dec)*5 - 9
15. (SC, Dec)*5 - 6
16. (Dec)*5 - 3
Finish off

Ears: In brown (Make 2)
1: 4 sc in magic circle
2: ch 1, turn, (inc, sc)*2 - 6
3: ch 1, turn, (inc, 2 sc)*2 - 8
Finish off

Nose: In white - starting in about row 6, straight down from the cow's left ear...
1: 5 sc (this row should stretch from the left ear to the right ear)
2: ch 1, pull tight and turn, Dec, sc, dec
3-4: ch 1, pull tight and turn, 3 sc
Finish off with a long tail, position the nose (allowing it to bubble a little to create nostrils) and sew the bottom down.

Tongue: in pink
1. Ch 7
2. In 2nd ch from hook SC, SC in next 2 st, hdc in next 3 SC, finish off.
Sew on a row or so below the nose. Then run the needle through the nostril hollow, catch the tip of the tongue, and pull the needle back through to make the tongue 'lick' the nose.

Horns: In white
1. 3 sc in a magic circle
2. SC around - 3
3. Inc around - 6
4. sc around - 6
5. Sc2tog, Sc2tog, inc, inc - 6
Finish off, leaving a long tail
Sew on in front of the ears.

Body & Legs:
Start with the legs.

Legs: make 4
In Black
1. In magic circle, SC 4
2. Inc around - 8
3. SC around - 8
4. (SC, SC, Dec)*2 - 6
Switch to brown
5-7. SC around - 6
8. (SC, SC, inc)*2 - 8
Finish off

Upper body: in brown
1. Join legs: Ch 2, 8sc[leg1] , Ch 4, 8sc[leg2], Ch 2, 8sc[leg3], Ch 4, 8sc[leg4] - 44
2. sc around. [2sc, 8sc, 4sc, 8sc, 2sc, 8sc, 4sc, 8sc] - 44
3-5. SC around - 44
6. 2 Dec, 18 SC, 2 Dec, 18 sc. (40)
7. Dec, 2 sc, Dec, 10 SC, Dec, 2 sc, Dec, 2 sc, Dec, 10 SC, Dec, 2 sc (34)
8. SC, Dec, 12 SC, Dec, SC, Dec, 12 SC, Dec (30)
9. Dec, SC, Dec, 5 SC, Dec, SC, 2 Dec, SC, Dec, 5 SC, Dec, SC, Dec (22)
10. 2 Dec, 3 SC, 4 Dec, 3 SC, 2 dec (14)
11. (Dec, SC)*4, Dec (9)
12. Dec around
Finish off

Lower body: in brown
1. 2sc, 4sc[leg], 4sc, 4sc[leg], 2sc, 4sc[leg], 4sc, 4sc[leg].
2. Dec, dec, dec, 4sc, dec, dec, dec, dec, dec, 4sc, dec, dec. (18)
3. Dec, 7sc, dec, 7sc. (16)
4. (Dec, 2 SC)*4 - 12
5. (Dec, SC)*4 - 8
6. Dec around
Finish off

Tail: in brown
1. Ch 3
2. SC in 2nd ch from hook, sc in next st - 2
3-5. ch 1, turn, 2 sc - 2
When the tail is the desired length, finish off and sew onto the body.

Assemble the body then sew on hair by pulling 1/2" lengths of thread through stitches and knotting them.
Trim to desired length. See previous highland cow post for more detailed instructions on the 'hair'.

Friday, February 10, 2023

Crochet Microamigurumi Highland Cow Keychain Pattern


I was inspired to create this little highland cow from this pattern I came across.

Materials:
Size 12 crochet hook
1 skein of brown embroidery floss
black embroidery floss
white embroidery floss
pink embroidery floss
keychain ring

Head: In brown
1. 4 sc in magic circle
2. 3 sc in 1 st , 1 sc in next st, 3 sc in 1 st, sc in next st - 8
3. 1 sc, 2 Inc, 2 sc, 2 Inc, 1 sc - 12
4-5.  sc around - 12  (mark round 4 to help in the placing of the mouth.)
6. 4 sc, 4 Inc, 4 sc - 16
7. 4 sc, (1 sc, Inc)*4, 4 sc - 20
8. (4 sc, Inc)*4 - 24
9. (5 sc, Inc)*4 - 28
10. (6 sc, Inc)*4 - 32
11-15. - 1 sc in each st around - 32
16. (6 sc, Dec)*4 - 28
17. (5 sc, Dec)*4 - 24
18. (4 sc, Dec)*4 - 20
19. (3 sc, Dec)*4 - 16
20. (2 sc, Dec)*4 - 12
21. (sc, Dec)*4 - 8
22. Dec around
Fo, leaving a long tail.
Use the end of the thread to sew the head on the body.


Bottom lip: In brown
You will be working in the 4th round of the head.
1: Turn the head upside down and, beginning in the center of the right side of the muzzle, in the 4th row, 3 sc, inc, 3 sc. This should bring you around to the center of the left side of the muzzle. - 8
2: turn, dec, sc, dec, sc, dec, finish off.

Upper lip: In brown
1: Turn the head right side up again and, working in the 4th round, starting in the same stitch you made your 8th sc for the bottom lip, 3 sc, inc, 3 sc (finishing in the same stitch you started the bottom lip in).
2: ch 1, pull tight, turn, dec, sc, dec, sc, dec
3: ch 1, pull tight, turn, dec, sc, dec, finish off.

Nose: In white - starting in the 2nd row and in the 2nd stitch in the upper lip...
1: 5 sc
2: ch 1, pull tight and turn, Dec, sc, dec
3-4: ch 1, pull tight and turn, 3 sc
5: ch 1, pull tight and turn, (sc, 2 hdc, sc) in 1st st, sc, (sc, 2 hdc, sc) in last st. 
Finish off, leaving a long tail


Ears: In brown
1: 4 sc in magic circle
2: ch 1, turn, (inc, sc)*2 - 6
3: ch 1, turn, (inc, 2 sc)*2 - 8
4: ch 1, turn, (inc, 3 sc)*2 - 12
Finish off, leaving a long tail

Horns: In white (for his left horn, I repeated round 1 and omitted the last round.)
1. 3 sc in a magic circle
2. Inc around - 6
3-4. sc around - 6
5. Sc2tog, Sc2tog, inc, inc - 6
6. Sc2tog, sc, inc, inc, sc - 7
8. 2 sc, inc, 3 sc, inc - 9
Finish off, leaving a long tail

Tongue: in pink
1. 3 sc in magic circle
2. sc around - 3
3. 3 sc, inc - 4
4-5. sc around - 4
6. (sc, inc)*2 - 6
7. sc around - 6
8. (2 sc, inc)*2 - 9
9. sc around
Finish off.

Body: In brown
1: 4 sc in magic circle
2: inc around - 8
3: sc around - 8
4: (inc, sc)*4 - 12
5: sc around - 12
6: (inc, 2 sc)*4 - 16
7: sc around - 16
8: (inc, 3 sc)*4 - 20
9: sc around - 20
Starting with round 10, you will be making a (sl st, ch 1) in the 1st stitch, then follow the rest of the pattern, starting in the 1st stitch.
10: (inc, sc)*5, (inc, 4 sc)*2 - 27
11: sc around - 27
12: (inc, 2 sc)*5, (inc, 5 sc)*2 - 34
13: sc around - 34
14: (inc, 3 sc)*5, (inc, 6 sc)*2 - 41
15-18: sc around - 41
19: (4 sc, Dec)*6, 5 SC - 35
20: sc around
21: (3 sc, Dec)*7 - 28
22: sc around
23: (2 sc, Dec)*7 - 21
24: sc around
25: (sc, Dec)*7 - 14
26: sc around
27: Dec around - 7

28: Dec closed
Finish off, leaving a tail  

Front Leg: Begin in black
1. Ch 4, turn, skip 1st ch, 2 sc in 2nd ch from hook, sc, 3 sc, working up back of chain now: sc, sc in last st - 8
2. sc around - 8
3. sc in next 3 st, sc3tog, sc in next 2 st - 6
Change to brown
4-6. sc around - 6
7. sc, inc, sc, sc, inc, sc - 8

8-11. sc around - 8
Finish off, leaving a tail


Back leg: Begin in black
1. Ch 4, turn, skip 1st ch, 2 sc in 2nd ch from hook, sc, 3 sc, working up back of chain now: sc, sc in last st - 8
2. sc around - 8
3. sc in next 3 st, sc3tog, sc in next 2 st - 6
Change to brown
4-7. sc around - 6
8. sc, inc, sc, sc, inc, SC - 8
9. 2 sc, inc, 3 sc, inc, SC - 10
10. 7 sc, inc, sc, inc - 12
11-12. sc around - 12
13. Dec around - 6

14. Dec around - 3
Finish off, leaving a tail

Tail: in brown
1. In magic circle, sc 4
2. (sc, inc)*2 - 6
3-8. sc around - 6
9. Flatten and sc across - 3
Finish off & sew on tassels

Assemble the cow, embroider the face, and attach the hair.

For the hair, I just cut thread into about 1/2" lengths then pulled a loop through a stitch and pulled the ends through the loop. Here are some pictures to help understand how.

Keychain Penguin Microamigurumi Crochet Pattern


My pattern is based off of this pattern. I needed mine to be a little smaller than the original, so I scaled it down somewhat, but otherwise pretty well followed The Blue Elephant's pattern.

For the Body part of the pattern - My body was a little longer and skinnier than I would have preferred. Changes I recommend for next time I make it:
#1 - Begin the white in round 6 (in black (inc, 4 sc)*3, in white (inc, 4 sc)*3).
#2 - move round 17 to before round 15 so all the (sc around) rounds are together. Then just do all the (dec) rounds after.


You will use:
Size 12 crochet hook
1 skein of black embroidery floss
1 skein of white embroidery floss
1 skein of orange embroidery floss
1 keychain ring

Head: Begin in black
1: 6 SC in magic circle
2: inc around - 12
3: (inc, sc)*6 - 18
4: (inc, 2 sc)*6 - 24
5: (inc, 3 sc)*6 - 30
6: sc around - 30
7: In black 4 sc. In white 3 sc. In black 3 sc. In white 3 sc. In black 17 sc. - 30
8: in black 3 sc. In white 4 sc. In black 3 sc. In white 4 sc. In black 16 sc. - 30
9: in black 2 sc. In white 6 sc. In black 1 sc. In white 6 sc. In black 15 sc. - 30
10-11: in black 1 sc. In white 15 sc. In black 14 sc. - 30
For the decrease round, use white over the white stitches and black over the black stitches. As you decrease, you’ll see the white section get smaller towards the bottom of the face.
12: (Dec, 3 sc)*6 - 24
13: (Dec, 2 sc)*6 - 18
14: (Dec, sc)*6 - 12
15: (Dec)*6 - 6
Finish off

Body: Begin in black
1: In magic circle sc 6
2: Inc around - 12
3: (inc, sc)*6 - 18
4: (inc, 2 sc)*6 - 24
5: (inc, 3 sc)*6 - 30
6: (inc, 4 sc)*6 - 36
Attach the white yarn and work the first half of the round in white (18) and the second half in black (18). Continue working half white and half black as you decrease.
7-14: sc around
15: (Dec, 4 sc)*6 - 30
16: (Dec, 3 sc)*6 - 24
17: sc around - 24
18: (Dec, 2 sc)*6 - 18

Beak: in orange
1. In magic circle SC 4
2. (Inc, sc)*2 - 6
3. sc around - 6
Finish off

Flipper: (make 2) in black
1. Chain 5, turn, skip 1st st, 4 sc - 4
2-5. Ch 1, turn, Inc once, then SC to end - 8
6-12. Ch 1, turn, Dec once, then SC to end - 1
Finish off.

Feet: (make 2) in orange
1. 6 sc in a magic circle
2. sc around
Finish off.

Assemble the penguin, embroider the face, and attach the keychain!

Friday, January 13, 2023

Sir Charles Digalot the Mole Crochet Pattern

I had some yarn to use up, so I just started crocheting and this little mole is what appeared!


Body: In brown
1. In magic circle, SC 6
2. Inc around - 12
3. (Inc, SC)*6 - 18
4. (Inc, 2 sc)*6 - 24
5. (Inc, 3 SC)*6 - 30
6. (Inc, 4 sc)*6 - 36
7-9. SC around
10. (Dec, 4 sc)*6 - 30
11. SC around
12. (Dec, 3 SC)*6 - 24
13. SC around
14. (Dec, 2 sc)*6 - 18
15. SC around
16. (Dec, SC)*6 - 12
17. SC around
18. (Dec)*6 - 6
19. Dec closed

Head: In brown
(The nose will look funny at first, but you will end up flipping it inside out and it will look fine.)
1. In magic circle, SC 4
2. (SC, inc)*2 - 6
3. (SC, inc)*3 - 9
4. (2 SC, inc)*3 - 12
5. (3 SC, inc)*3 - 15
6. (4 sc, inc)*3 - 18
7. (5 SC, inc)*3 - 21
8-9. SC around
Flip inside out
10. (5 SC, Dec)*3 - 18
11. (4 sc, Dec)*3 - 15
12. (3 SC, Dec)*3 - 12
13. (2 SC, Dec)*3 - 9
14. (SC, Dec)*3 - 6
15. (Dec)*3 - 3
Finish off

Arm: (Make 2) In brown
1. In magic circle, 6 sc
2-7. SC around
Stuff and finish off.

Foot: (Make 2) In brown
1. In magic circle, 6 sc
3. sc around - 6 st
4.(sc, dec)*2 - 4 st
5-7. sc around
Finish off and stuff

Tail: In brown
1. In magic circle, sc 3
2-6. sc around - 3
Finish off and stuff
(You can make this as long or short as you like.)

Tophat: In black (I used a size larger yarn for the hat and suit jacket so the pattern may need revised if you use the same size yarn.)
1. In magic circle 6 sc
2. Inc around - 12
3. In FLO, SC around - 12
4. In both loops & back loop of round 3, SC around - 12
5-6. In both loops, sc around - 12 (may need extra round)
7. In FLO, (sc, inc)*6 - 18
Finish off

Suit Jacket: In Black (white - optional) (I made this with a size larger yarn too)
1. ch 7
2. Turn, skip 1st st, sc, sc, skip 1 st, sc, sc - 4
3. Turn, ch 1, 4 sc - 4
4. turn, ch 1, 2 sc (ignore last 2 st) - 2
5. turn, ch 1, 2 sc - 2
6. turn, ch 1, 2 sc, ch 1, dc in top sc in row 4 - 4
(at this point, I was running out of enough black so I switched to white yarn. You can either switch colors or keep it all black)
7-12. turn, ch 1, 4 sc - 4 (This would be better if rows 9 & 10 had a dec at the top so the neck line doesn't buckle.)
(at this point, I switched back to black)
13. turn, ch 1, 4 sc - 4
14. turn, ch 1, 2 sc (ignore last 2 st) - 2
15. turn, ch 1, 2 sc - 2
16. turn, ch 1, 2 sc, ch 1, dc in top st of row 13 - 4
17. turn, ch 1, 4 sc - 4
18. turn, ch 1, 2 sc, ch 3, 2 sc
Finish off

Embroider face